Friday, October 23, 2015

Tea Leaf Quartet Quilt finish

Last year I got the idea that I wanted to try a quilt top design with curved piecing after focusing on log cabin blocks made with all long strips. I found a pattern for free from Tim Latimer the quilter who blogs about hand quilting in Michigan. Tim is really good and really fast at hand quilting and is always an inspiration for me. I follow his blog Tim Quilts ( link to the post I used as my guide for this quilt) he does all sorts of quilting projects and on his blog tells how and is very generous Tim Quilts has new posts about once a week.
I had a collection of fabrics I bought earlier shopping in Manassas at Hancock Fabrics and Joann's with my mom in a matched color way and then I added a little more from my stash. I decided to adjust the block pattern a little for my first repeat pattern curved piecing project. Tim used fat quarters and I had lots more fabric than he did so I added a quarter inch to my  the edges of the curves to allow a 1/4 inch along the seam at the edges of the finished blocks. That was the only design change I made. I even used his pattern of quilting stitches for my quilt. but I wasn't as fast as his fast quilting goes. As a matter of fact, I realized once I was into the quilting it was way too much for me. I struggled to get the quilting done all year but finally have it completed it, bound and washed and dried.... Ready to share. It's a throw size 46 x 61 inches. I used black pearl cotton #8 to do the leaf pattern and echo the leaf shapes in the design. 
The blocks finished up at 8 inches square for each leaf and took me one hour and 17 minutes to quilt completely using Tim's intricate design. The quilting shows up best in the salmon and sage green blocks and on the back solid salmon.  


There is one block I left without black quilting veins that I tried to label on the reverse by embroidering my title block right on the finished quilt. I don't recommend labeling this way but maybe with practice I could do better...
The entire back shows the great leaf and circle in squares design of the intricate quilting pattern. label at the left near the center. 
This was a fun quilt and I loved the resulting quilting patterns but the labor made it something I would simplify for future hand quilting projects. I am grateful to Tim for giving us a good pattern to begin me down the curved piecing pathway. More to come! It's not as hard as you might think if you never did a curve look for help and give it a try once you get the hang of it you won't look back. 

Wednesday, October 7, 2015

a new journal

Today I want to tell you about and show a new patchwork piecing project this month. It is a cover for a coptic bound journal. I use them to write in and sketch ideas for new quilting projects. Last year I made a pair of patchwork improvisation blocks using some of the scraps from my big Orange Explains It quilt scraps. Compared to the regular book cloth covered coptic bound journal this was clearly fun and interesting to do but extra time intensive. That is because to make a cover with fabric one has to add a paper backing to the cloth patchwork before gluing to the book cover boards. Double the glue work but doubly unique in the final book covers.
Orange Explains It scrappy Coptic bound book 

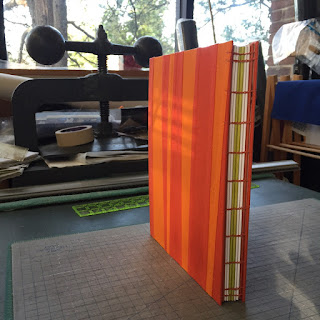
After I completed this first book I gave it to Keith for Christmas and figured I would make myself another one in the winter. It never happened until now but recently I finished up a big quilt top using two tones of orange and had scraps that were long strips and by adding them together and cutting them I got a new type of scrappy quilt block for my next book. See images below of the new cover...

Inside this new journal I added some wrapping paper we bought last year at that great paper source store in Georgetown with various feathers printed for my end pages. I like to use a heavy Strathmore paper for my fly pages in this case darker orange. I also had orange beeswax coated linen binder's thread to finish up the orange theme. While sewing I decided not to add glass beads to the spine but to use a soft paper and insert a little yellow-green or chartreuse over the two center folios for some colorful interest on the spine. 


In the back ground there you can see the big copy press I have on my studio desk. That is how I get the paper and glued fabric to stay pressed flat before and after I apply it to the book cover boards. It's a very heavy tool but a great one to have. 

A friend on Instagram asked about the needle I use. It is a bend binder's needle in this case one that I bent myself a trick I learned at my first class in Coptic book making with Daniel Essig years ago at Pyramid Atlantic Art Center when it used to be in Riverdale, MD. We plan to have a fabric block printing workshop for quilters at the current Pyramid Atlantic home in Silver Spring, MD next January 2016 for DC Modern Quilt Guild members. So here are a few images of my process as I built the book. 
detail of the first 6 signatures sewn in place with orange thread and chartreuse paper over the spines of two signatures. 

look closely to see the bent binders needle is tucked under the thread which is all that holds the coptic journal together. 

book assembly is one signature at a time added using a single tread and needle.