Showing posts with label Add a Boarder. Show all posts

Saturday, January 9, 2016

Add a Border block quilt finished


A few years ago I joined an Internet group of quilters who swap small blocks and add borders to each then send them off to others to add more rounds until a 6 inch block becomes 24 inches then it is given to the first to lay claim to the block. A nice fellow in Kentucky hosts the block swap sending and resending the blocks from one quilter in the Flickr.com group to the next. Here is a link if you want to see some of the work or join in the fun:  AddABorderBlockSwap on flickr.com 

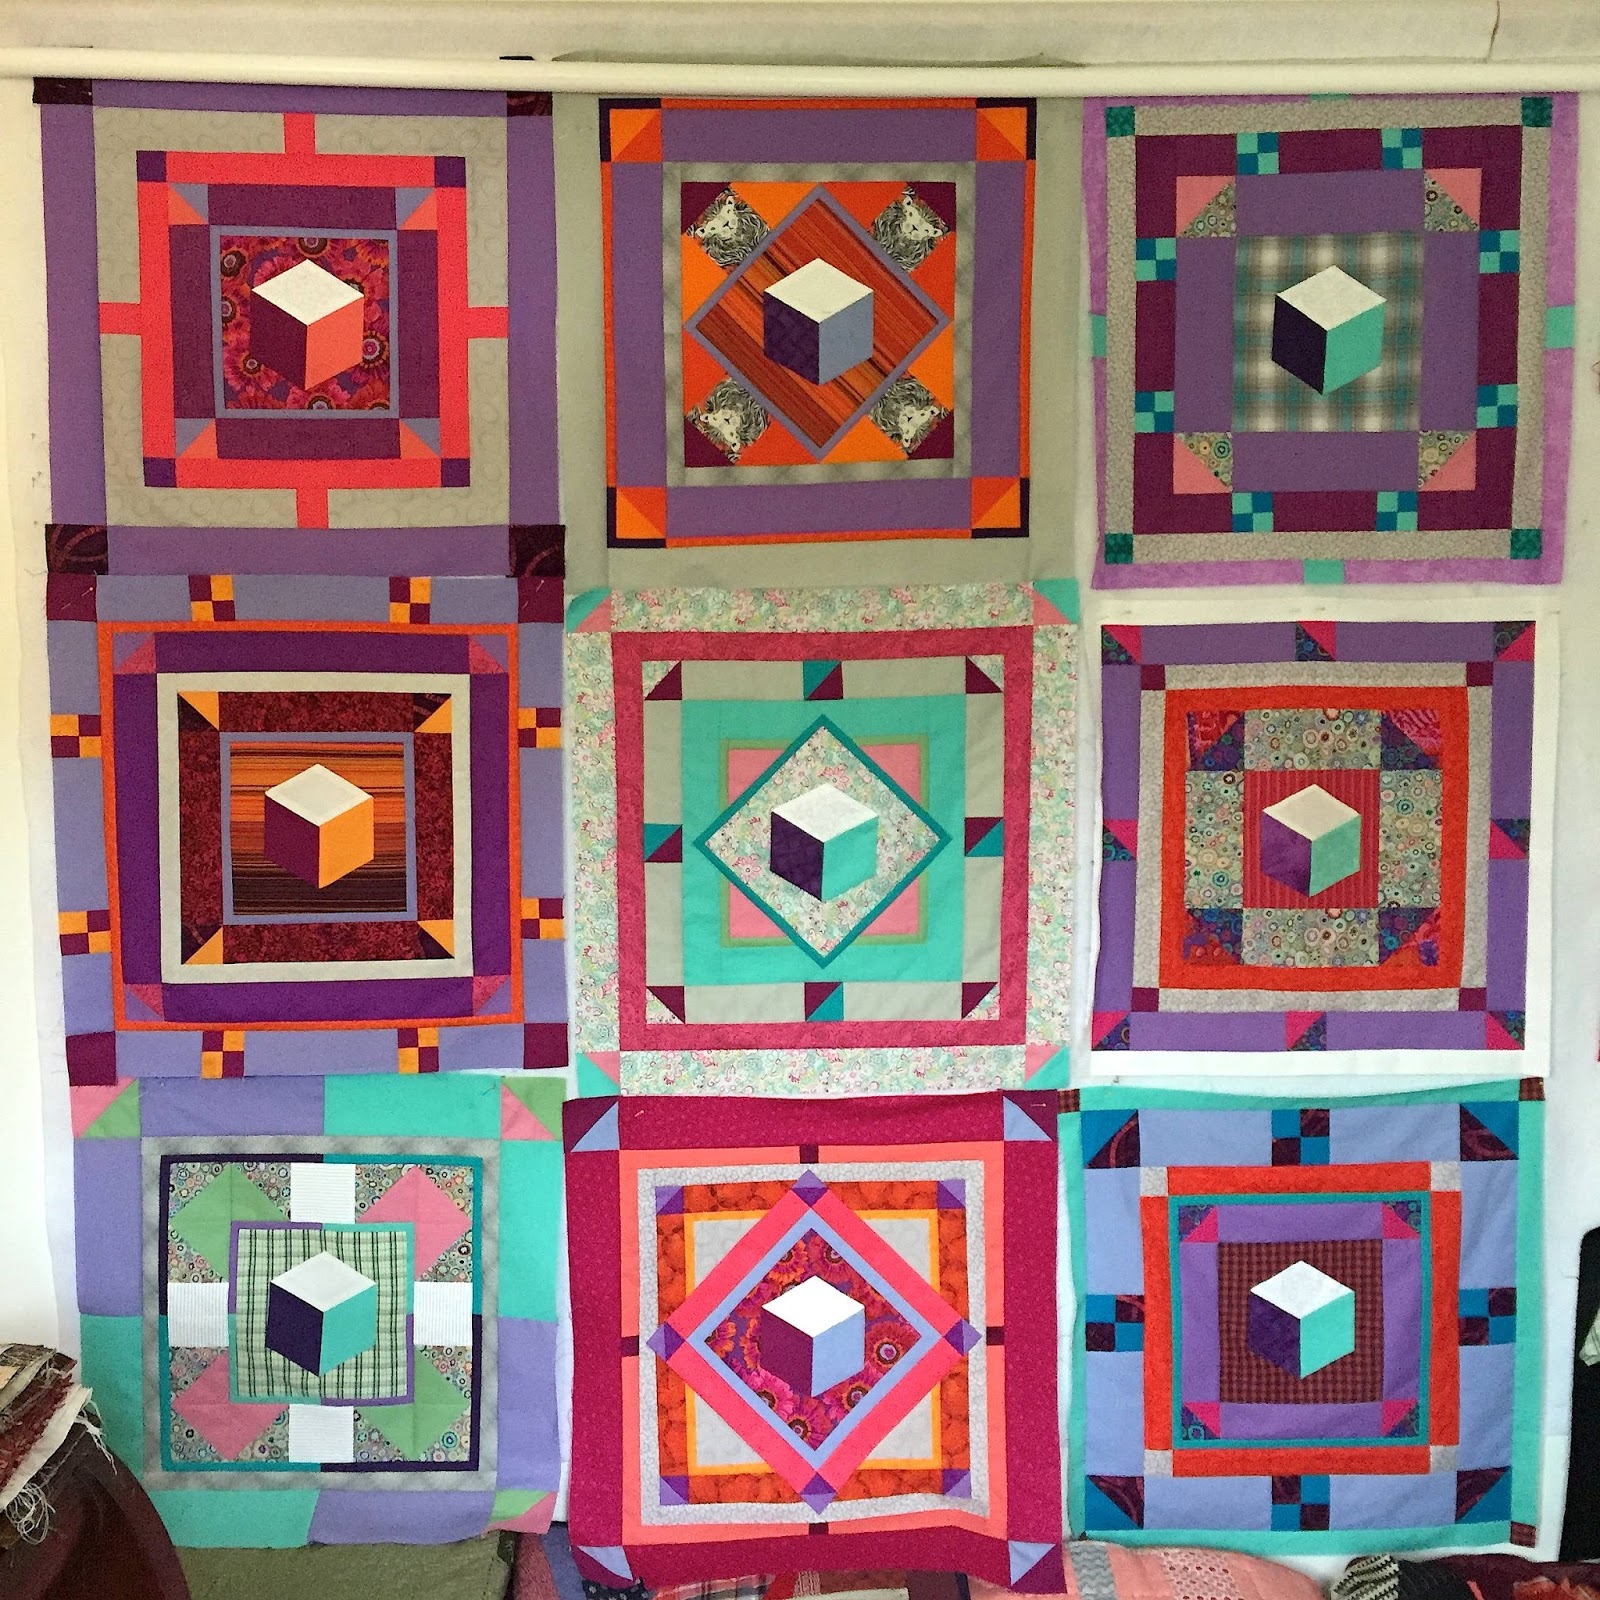
AFter a while in the group I never got to select a finished block so a second option was to keep one you liked and replace it. I chose this block after adding a round to it because I fell in love with the orange/magenta striped background fabric and the hexagon hand pieced block on it that looked like a toy block. It was made by Ed Hart who goes by Cattail in the group. I chose it as my block to keep and pinned it to my design wall to ponder how to build it into a queen size quilt top of my own improvising from this beginning. 


Not long after deciding to keep this block I put it away because I had so many quilt projects already underway and this project was not clearly worked out in my head.
The following year once all my Log Cabin quilts were completed I tried again. This first block built up to about 24 inches square and I realized that to keep going, like some other quilters do making it all a giant medallion, was going to be really difficult to keep my quilt squared. The wobble was starting to distort the square shape after adding only three more rounds! 
Next idea was to make more blocks like this improvising my way along with my core design element taken from the original block, the three diamond hexagon on a bright background that looks like a three dimensional toy block sitting in a field.

Next step was to make some three inch diamond English Paper Pieces and try to match the fabric of the original block with purple, white and green from my stash. It was fun making them up and hand stitching them together a couple at a time. 
The second block was different because the background was different and so it went on and on with each new block. Once I had four I decided I was going to organize them by doing a big nine patch design for the overall quilt pattern. 
Second block used a tartan shirt fabric given to me by Melinda Newton as my background
 The colors shifted to the purple and aqua range and I wanted to keep the magenta, red and oranges in the quilt so I chose another tartan in red and dark blue as the third block's backgrounder.
Third block 

4th block got a different colored hexagon in the center using a warm pink with magenta and white then the  flower background with oranges purples and magenta pinks. 
In this 4th block I was ready to take a step aside from the aqua purple theme and move back to the pink purple orange end of the range of colors. I am not sure why but it felt right when I headed in this direction looking at all four it needed this brightness. 


Three of the 3 inch central hexagons trying a new orange magenta color theme in the center hexagon. 
Then I wanted to throw a twist in and added a block with a diamond setting of the central hexagon. It was fun and a little tricky to add triangle blocks split in two...

I blogged earlier about messing this one up at our guild sewing day. I  cut that orange edged block in half the wrong way first thing and had to start it all over when I got home but that is a good example of how much thought and concentration is required to get the results you want in quilt top piecing.  This is how they looked before I cut them in half to create a triangle to add to the diamond block center. 

The various blocks all improvised pieces totaled nine which took a while to even up with extra rounds of thinner and thicker bands. In the final judgement I chose to add some solid magenta as sashing to draw all these unmatched blocks together to make a top to fit my queen sized sleigh bed. 
I was influenced by the hand work movement to make up some one inch English paper pieced tumbling blocks to include as a sort of button decoration on the intersections of the sashing. I wanted to add some scale to the theme small and large. 

one inch and three inch English Paper Pieced blocks in the quilt side by side
They were so small that I had a struggle to figure out how to get them on the intersections of the sashing and decided that applique was my best bet once the whole was hand quilted. I chose # 8 pearl cotton in contrasting or matching colors to detail the big blocks and surround them on the sashing leaving room for these small tumbling blocks at the intersections. 
Hand quilting with big stitch purple pearl cotton # 8

quilt top before the quilting began laid on my bed with four tiny one inch tumbling blocks at intersections 

detail of finish 

detail of finish hanging 

detail of central block finished 

Finished hanging by my bed (see the foot board lower left blocks the full view)

Hanging Tumbling block quilt improvisation based on the original "Add a Border" block from Ed "Cattail" of the block swap group. 
I wanted to thank Ed Hart for the inspiration and Dustin Cecil for sending me this block that has kept me busy for the last couple years. I regret that my home is kind of small and tight so the finished quilt shots are cramped but maybe next weekend when I show it at the Washington DC Modern Quilt Guild meeting I can get a better photo to add later. 
I would love to hear your comments and questions on my blog posts about quilting or any other topic I cover. Be aware if you do comment I have this blog set  for all comments to be approved by me before they will appear on the site. It might take a day or two to get to them and post them thanks for your patience.  

Monday, June 8, 2015

Denyse Schmidt's Pure Improv Workshop: the experience.


Today I want to record a very exciting experience that deserves more than a passing flash of colorful pictures and hash-tag (#) labels. My Washington DC Modern Quilt Guild hired the renowned designer Denyse Schmidt to come give us an improvisational quilt piecing workshop class. It was months in the planning for the guild to pull this off and I have to thank all those board members who made it happen so flawlessly. There were no glitches and it really was a lot of fun as well as a really memorable experience. 20 quilters and one instructor in a big long room where we each had a table to ourselves, so luxurious for a guild gathering. Rented class room was at G Street Fabrics in Seven Corners.
The project we undertook after getting introductions done see in this image where we told Denyse a little about our quilting experience and what we hoped to get out of this class. Next we got instructions how to begin a quilt block called Shoeman's Puzzle a vintage block from her last book. We made templates and cut our two tones of fabric into  the triangles and then assembled them as a traditional quilt block is made. 
Anjeanette cutting her first blocks pieces using the templates we all made. 

Then we had to do the same block free hand cut and sewn. It was done with a slightly larger square of fabric to allow for a bit of less accurate seam sewing on our hand cut blocks. It was hard to tell the difference once we all made our 4 blocks two each from the two techniques. 

with the pattern

free hand cut beside pattern cut; can you see a difference?

For fabrics I used a nice orange and a red-orange as my two colors. They are close in value and intensity of hue as well as tone. These colors were not a surprise to anyone, given the reputation I have. The next step was to begin the improvisational block making. We were allowed to cut the triangles from a slightly bigger square to allow for shortened blocks in the end but we had to take care not to anticipate what the end result would be. Denyse told us not to try to save fabric she said just cut, sew and see what came out!  Working without trying to see the end before we began or during the process of making. That was very hard for an experienced quilter wants to get the most out of each cut of precious fabric and one wants to be "in control" start to finish. This is the challenge of the day: let go and don't try to be in control of the results until you get to the finishing process. It sounds like it is all in your head and it is. To let things happen without knowing what the result will be feels uncomfortable but as Denyse tried to explain that is when some of the most delightful things happen in improvisational quilting.
 
You can see everyone behind me was working hard and deep in the making process time just flew by when it was time for lunch we were well on our way towards beginning. After lunch together in the room out of Panera Boxes we set back to work with about two hours left to sew and a half hour for critique and discussion. Denyse was there all through the class ready to answer any questions and I had a few. Mostly worry about how the end result was going to fit together or something like that... my felt wall fell once and she kindly helped me rehang it and put the blocks back up. 

As we got a nice selection of blocks made and began looking a little at how to assemble them on the design wall the question of came up of adding a third fabric. It was suggested we try to stick with just the two for most of the day but when we felt we needed a change we should begin to try out a third fabric. For me the beautiful colors of red and purple Melinda was using just down the row were calling out to my oranges. I was dying to get a little bit of that purple into my composition and I was getting sick of red and oranges, sick to death and I felt blinded by the colors because they were so much the same. I decided it was time to cut a nice patterned hot pink-magenta fabric square and work it in with the red-orange first. I got two made and began the second pair and the bell went off and we had to Stop for our final discussion critique. I slipped in one more before the talking really got going. 
Melinda's purple red combo behind Denyse was near my station.
Before my design wall fell for the second time it looked like this... thanks to Cathy who's work station was beside mine and took a snap of this arrangement.  

Jamie's new born came with her to this must not be missed workshop. I never heard a peep out of her and I know her mom was really glad to be there in spite of the stress and dad came came along to help hold her while mom sewed! 


Willa used high contrasting colors and therefore her layout changed to reorganize the colors in a way that appears organized. 

Gray and white gauze was Jenny's combination and she began adding a little oxford shirt blue a subtle shift in hue but the value is the same! Very nice. 

 I got an autograph on my Denyse Schmidt book! The cover is orange by the way and I was drawn to it in a bookstore in Colonial Williamsburg year before last and asked for it as a gift! It's a great inspiration and meeting Denyse and hearing her story later at the slide lecture she gave made me realize we have a lot of similar interests in the arcane crafts of past, she learned stone letter carving and I went into hand book binding and letterpress printing. She was drawn to Appalachian quilting traditions, music and folk dances are some other areas of creativity I love like she told us she does too. She even participated in NYC East Village performance which I did back in the 1980's as well so if I ever get the chance it would be fun to see who she knows I know from that era as well. Whatever I learned late was great because I could tell when I read her book we liked history and the folk culture of American Appalachian people. It's funny that she is working in the same city in Connecticut where I first saw the Yo yo coverlet that inspired me to make my own when I was twelve years old... I would love to share that story with her but a day of quilt improv block making was a real treat.

In conclusion I wanted to say that this was a good class. I felt like I was back in college again because we had a lot of time to work with our materials and there was lots of professional attention and support from our instructor. Denyse gave us just the right amount of challenge and freedom, she added a dose of confidence: she would be there to answer any and all questions. She pushed us to use this time to try something admittedly uncomfortable but that could give us a lot of exciting new possibilities if we let go of control to allow accidents to show us new ways to use patterns. 
I realized when I got home and laid on my bed which is next to my current improvised quilt design that I was seeing all these finished tumbling blocks (see 5 below) in a whole new way! I realized I was perhaps being too tight and even though I am having a blast fussing over the colors, patterned prints and symmetry there are so many possibilities I had overlooked or not allowed to happen. So there are a few more tumbling blocks to build to make a complete quilt but now with my new education and renewed excitement about the process I have permission to let some of that tightness go and see where it takes me. I also have a great new Orange quilt to work with in the coming months.
Thank you Denyse Schmidt and DC Modern Quilt Guild for introducing me too. 


Monday, October 21, 2013

Improvising again

Burgundy and navy blue were my theme colors for this quilt, sized 45x68 inches. 
I began with a small scrap of diamonds I had left over from the "add a border swap"  building a bigger block using those two colors. I liked the result and kept building new  blocks, just short of a full bed sized quilt because this project was getting a washable wool batting. Never having used wool batting before, I thought it wise to begin with a small quilt.
my first block with the burgundy diamonds left over from add a border swap
 I was working on this during the week of the big Navy Yard massacre and I missed picking up my "Orange Explains It" quilt  from Anacostia Arts Center because police hand closed the 11th Street bridge and I didn't know any other way to get over to that neighborhood. I was feeling sad most of that week due to the tragedy but I had my quilt to kept me busy. I was very excited about the developing blocks and didn't dwell on the news coverage after the first day. It was nice that the arts center asked to keep the quilt for a while longer. I was happy to lend it to them for a extra long display.
back is navy and white plaid with burgundy and navy blue Perle #8 quilting 


crossing lines of burgundy and navy blue Perle #8 quilting 

Burgundy and Blue finished throw sized quilt 45x 68 inches

This past Saturday I enjoyed sharing my two finished quilts with my friends at the Washington DC Modern Quilt Guild meeting at the library in Rose Hill, Virginia a subdivision in Alexandria. The meeting was only a block from my Uncle Bernard and Aunt Betty's old home. I knew the neighborhood from our holiday visits during the 1970s. It hasn't changed much excepting a nice new Indian restaurant in the shopping center across the street where I ate with Aubrie one of the local quilters from the group who recommended it as a new hot dining spot. We were surprised to find her newly wed husband and his pal, a civil war re-enactor there and shared a table with them. They were curious what we do at guild meetings and we tried to explain it but if you are curious you can read a after meeting round up on our blog and see photos of my guild's quilting work from our show and tell here:    http://tinyurl.com/qa24mr9
These guys both hand sew their own uniforms for the recreations of various civil war military units they portray at the mock battles both Northern and Southern units! Sounds like fun to me but I don't know much about military history nor guns so I am happy to focus on domestic quilting history in my sewing. I was surprised to hear they thought they knew a tailor in Colonial Williamsburg who led me and some of my family on a tour of a 18th century costume exhibition there about nine years ago. It's a small world.

Wednesday, May 8, 2013

progress slowly

I am making progress on the orange quilt, piecing a top big enough to cover a bed is the the goal I have in mind. It will be hand quilted with simple lines like the Gee's Bend Quilters from Alabama use on their modern quilts. The last  DC Modern Quilt Guild monthly gathering we met in a new location with a big room. We needed space to set up sewing and to spread out the many scrap fabric piles for an exchange. We also used some space to lay out our orphan blocks for a charity quilt to be determined in the future. I didn't get a photo but there was a lot of fabric and finished block pieces looking for a project to join. I was gifted bunches of new orange fabrics for this project which I am beginning to incorporate into the new blocks. Thankfully they came just in time because I was running out of options with my original scrap collection shrinking.


Recently I joined a group on flickr.com that is doing block swaps to "Add a border" to a small 6 inch quilt block and return it to the host in Kentucky on a homestead farm. Dustin Cecil is the guy who hosts and he is a young quilter and farmer raising heirloom animals. I sent my first block called Dusty Hour Glass to him and in return for my first block called Bloomelicious which arrived last week. I got to work adding my border quickly. The boarder includes navy blue with white polka dots, yellow from the scraps swap at DCMQG and some orange.  I sent it back to get two more rounds of boarders before it's retired.

Bloomelicious block with the first 3 inch border I added to make it 12.5 inches square

Dusty Hour Glass my 6.5  inch block sent in for borders to be added
After a couple days stuck in the house due to rain I am making progress on the Orange block building and it is beginning to take shape. The garden is going nice and slow too but no orange out there yet mostly chartreuse and spring greens. The clematis are blooming now and the iris are coming in slowly. The cool weather of the last few weeks really has been great to make this a slow and almost normal spring unlike so many we have had since climate change became so noticeable about twelve years ago. 


Japanese Roof Iris 

New white clematis 

purple German bearded iris 

maroon columbine

Spirea 

Hosta leaves new look the best each spring

Red columbine is a native woodland flower

Red and green sempervivum 

clematis 

Northern Maidens Hair fern

ironing board and new blocks for Orange quilt