Showing posts with label sewing. Show all posts

Monday, January 5, 2015

zipper bags (with an update 2015)


Finally I had guts and time to try my first zipper and bag this past weekend while nursing my nasty head cold with antibiotics and mourning my broken molar tooth. Regrets to the Christmas caroling party I missed while I got completely caught up in the excitement of making something new with new tools and techniques home, all alone.
It began months ago with a inspiring blog post that made me think it might be simple, on Linda Fasules "I Finally Have Time" blog.
I bought a zipper foot for my antique Singer Featherweight machine and some zippers with thread to match some of my fabrics. Then they all sat in the bag for many weeks as I learned more about what I needed. I had collected some of the wrong materials which I discovered in emails with Linda. In any case the right stuff was collected several times over until it was just a matter of getting the time and intestinal fortitude to try inserting a zipper. My mom says they are not easy for her but "you should be able to do it with your skills" implying I am a better sewist than her. I wasn't so sure but eventually I dove into research on Google and YouTube and found out how to use the zipper foot and how to sew in a zipper.  Keith got off on his holiday travels and I set to work. I followed the free pattern on Noodlehead  to build the whole pouch, piece by piece while learning a few things about zippers as I went along. In the end I was pretty happy with my first zipper installation and the resulting bag that I am using right now to store a big fist full of loose charging wires and cables as well as mini speakers and my old iPod.


Now that my illness is past and the holidays are too and I have given away one bag as Christmas gift. I can share the whole story as it has developed into more of a rainbow of fun bags than when I sat down to write this post back on the weekend before Christmas.
I was home alone some of that week before Christmas sick but slowly recovering and I had a collection of zippers and lots of fabrics to choose from to make more zipper bags. I tested out shifts in details of how the batting went in with the zippers and the length of the "tab" on the end of the loose zipper eventually adding a folded loop to use as a handle or hook to hang the bag up. This feature of the zipper hanging out rather than embedded in the walls of the bag allows the top to fully open in a way the other bags do not . I finished up one amethyst Downton Abbey bag using the fabric line designed to show elements of Edwardian to Deco fabric designs inspired by the popular PBS Masterpiece series we watch. I wanted this bag to be special and to incorporate four fabrics from the Andover's Women's Downton Abbey line so I made half-square-triangles to run on the top side of the bag and used the dark art deco black with gray fan print for the bottom. Inside is a black feather print on creamy white for the lining.

Then I took off in a more colorful direction and added some Kaffe Fassett Studio blues and turquoise solid to go with the peacock blue-green zipper! Followed fast on by a very pretty big print Toile de Jouy fabric I found and fell in love with a while back. That got a blue bottom and has a castle on one side with a tree that meets the same tree on the other side where a boy stands with a fish trap he has just pulled from the passing river... It's got a white print on creamy lining which Linda schooled me makes it easier to find things inside your bag if the lining is a light color. 


Next another blue Kaffe Fassett bag this time with bright blue, a black zipper and a gray modern brushed printed lining fabric. 


Last, but not the least, as I think they just keep getting better as I make them. Last came Coral with the special fabrics from Finch Sewing Studio in Leesburg, VA I got last summer in Coral red and pinks. I  find that the last one I made is always my favorite one. Do you have that experience when you make things? 


Wednesday, January 9, 2013

tiny quilt project

Madrone Road Fabric swatches plus white for quilting Challenge 

I have a new project finally underway, a challenge I mentioned earlier. It's the Madrone Road Challenge given out to DC Modern Quilt Guilder members who wanted to play with these lovely fabrics. To prepare over the past two weeks I have been practicing making half triangle squares with the Shoofly blocks.
practice blocks of shoofly design

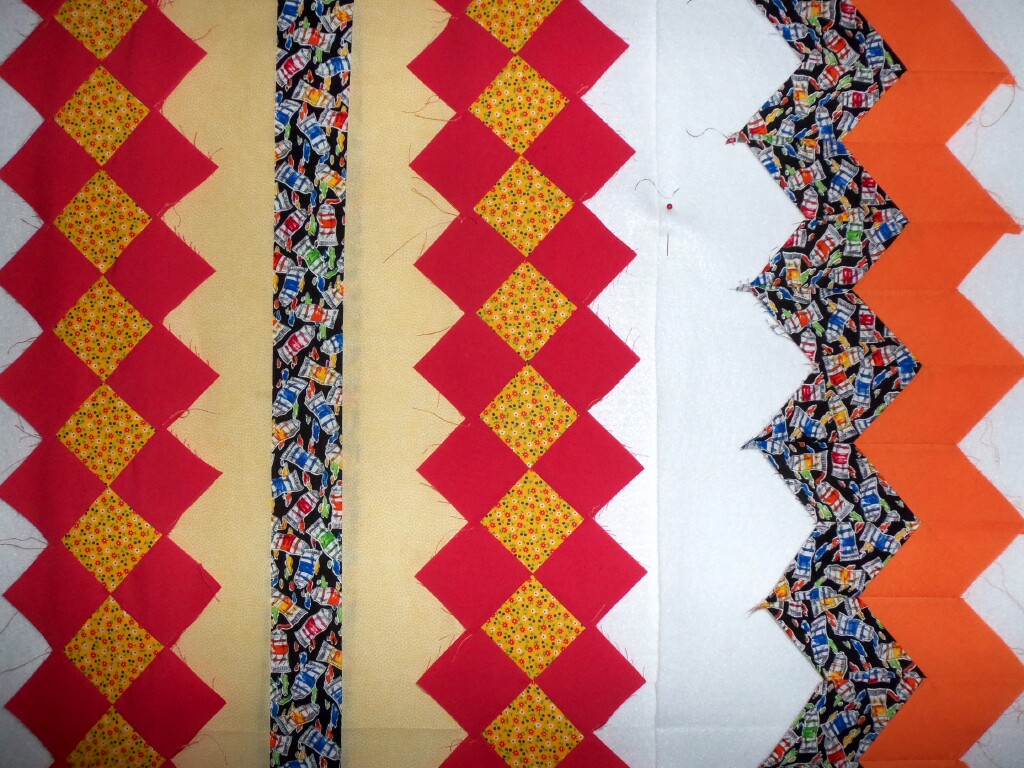
The Madrone road challenge is going to be double triangle squares in a 19th century pattern called "Birds in the Air" It's kind of like flocks flying over head when I look at the simple diamonds of these triangle squares. I am piecing the Madrone Road fabric with pure white muslin to make it go further. I am not sure how big the finished top will be but it has to be done soon and quilted before the end of the month. I hope to get it near done by the DC Modern Quilt Guild meeting on Jan. 19th or perhaps I will finish there at the sewing day meet up. It can't be very big in the end with only fabric  6/8ths of a yard but it is fun to have a matched set of fabrics for a change.
preview of the birds in the air layout 

1956 Thunderbird with Dan Murray at NGA

Last week I went to see the great retrospective exhibition of Roy Lichtenstein a famous pop artist known for his paintings of cartoons at National Gallery of Art with my pal Dan and he drove us down to the mall in his coral Thunderbird. I couldn't resist a photo of the car in front of the picturesque Capitol. The show is great fun and got me thinking about updating my quilting designs. Dan agrees I have traditional quilting down and I can slip some modern quilts in my folio. Traditional is historic and that is my favorite thing still it is nice to live in our times and reflect what is around us in some way.

Tuesday, October 9, 2012

walking foot

walking foot on the machine

a white plastic part of the foot catches the needle screw and rises and falls with the needle. That lifts the teeth of  foot to pull the fabric under the needle on top, matching the action of the lower feed dog teeth. 

walking foot 
New walking foot attachment arrived last week and I got right to work on the small green and white Williamsburg fence pattern quilt. I ripped out all the quilt stitching I did at the meeting of the DC modern quilt guild meeting in September using the flat foot.
I decided to do a test swatch and quilted a  pot holder square with the walking foot before I began on the quilt. it worked really well!

Then I added a bunch of new safety pins to the quilt to secure the layers. Then I began quilting the bigger project.  It works, it moves along so much better than the flat foot did. The walking foot pulls the fabric on top with teeth just like the "feed dog" does on the bottom under the foot. They move along in unison under the needle sewing very smoothly. The thick fabric, batting and backing is a fat sandwich of materials to pass under the needle of the sewing machine. It still needs to be basted together before sewing and I tried the safety pin basting trick. I was disappointed they didn't work perfectly but this was my first try using them. I bought a bunch more to make sure I had them pinned in about every six inches. It looks, as Keith says, kind of punk rock with so many safety pins.
quilt top with safety pins.

detail of the quilting with safety pin basting 

back striped side of the Williamsburg fence quilt 
Next comes the tape on the edges and some hand blind stitching to hold in on the back side... and this one will be done very soon. Then I can move on to the next project and practice more quilting on another small quilt. I know now that I am not ready to do a large quilt with this machine quilting technique yet. I hope with practice I will be able to do some very nice work on a full bed sized quilt. It's much faster than hand quilting as I expected. Thanks for loaning me your Singer sewing machine Mom, as you see the walking foot fits your Singer too!

Tuesday, October 2, 2012

on the flip side


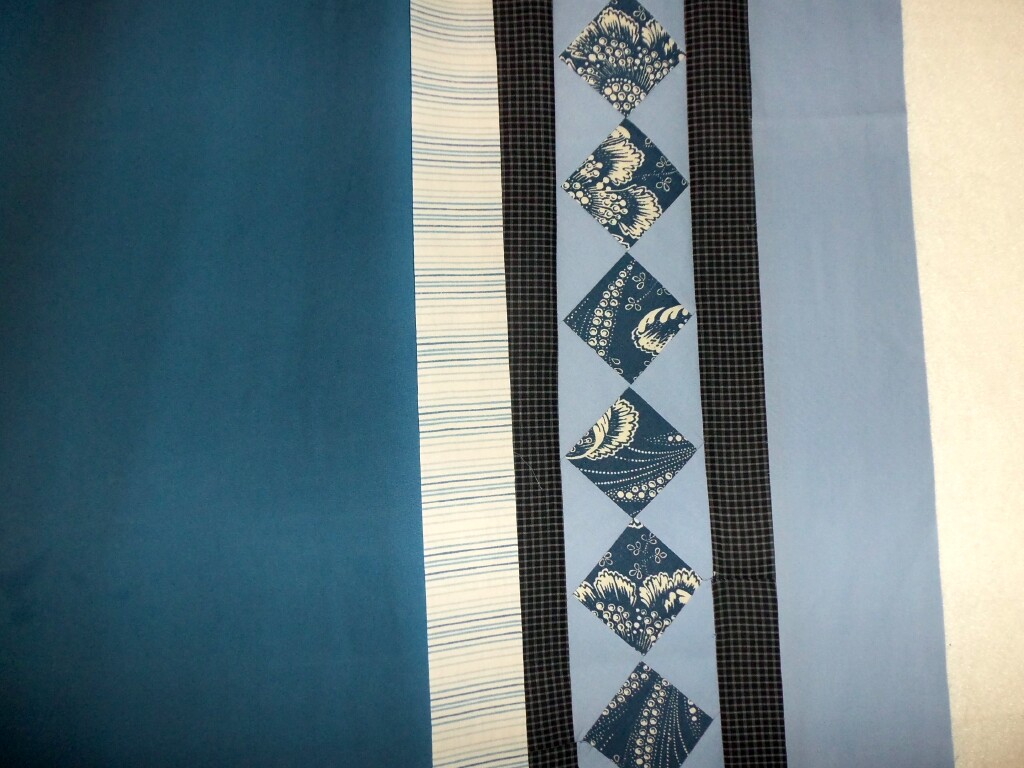
possible layout of blues for backing 

I have been working with Seminole strips the past week. The first, and my favorite strip, is the blue and white from my stay on the Chesapeake Bay. Now that I have the Dresden plate quilt top done I need a backing and I was thinking of using an old medium-dark blue sheet, (on the left in the picture above)  just plain and simple as it's back but that isn't big enough alone. It needs a little more. Which made me think how nice that blue strip of Seminole would would look on a large field of blues. I think it might be kind of modern like some of the big simple designs one sees around on the Internet. Today I measured and have begun to dream up a second Seminole strip to cross the first one and give my Dresden plate quilt back a cross or stripes of two designs. Mixing designs and fabrics up is the fun part of making quilts for me.
Dresden plate quilt top on the queen sized bed

Earlier I laid the quilt top on the bed to see how it fits and as I hoped, it covered everything. It measured approximately 88"across x108"long. That is 5x6 blocks 18" inches square minus the quarter inch seam allowance.  We can see above it fits and it is plenty big enough to cover the bed. Now I have to wonder how am I ever going to quilt this big thing on my tiny vintage Singer Featherweight? Clearly first I need to do some practice sessions with the new walking foot attachment and a smaller project to get the feel of how machine quilting is done.  The other version of Seminole with reds is on the design wall waiting for some more inspiration at the moment is is just not looking appealing to my eye. Warmer colors may be what I need for the next project to balance out the blues.
Seminole strips and stripes on the felt wall. 


Saturday, December 3, 2011

Inching forward

Crazy Quilt details 

I have been working on quilt projects most of this year little by little. I was lucky to have time and space to spread out and focus on my first real piecework quilt at the red house by the Chesapeake bay a few times this fall and completed it in record time. It came between the long term project that I began when I was twelve a yo-yo quilt which I finished in July. Then I had a crazy quilt I began in 1999 that I had to set into deep storage due to some physical disabilities which made embroidery and complex abstract piecework very painful. After my trip to Williamsburg and completing the Fairhaven Summer Quilt I decided it was time to try a new design of my own which is based on the fencing design I liked there. I also pulled out the crazy quilt pieces to take with me for a long weekend at the bay. Lucky I did because the sewing machine got jammed up and I didn't finish as much as I had hoped to do on the Williamsburg project. So I began working a little hand work again on the crazy quilt blocks. It is always fun but I know I have to go inch by inch not great leaps and bounds to prevent injury to my neck now. How ever it is a delight to work on it little goals come with great pride and reward each time I finish a line of embroidery it feels like a home run or a field goal! I also delight in the images I can make of the close work to share on flickr. and facebook. So I thought it would be fun to show some of them today. I recently bought some dark red velvet to do the edges and hopefully will be able to buy enough to use it as the backing for this elegant creation.

Lavender lacy medallions with yellow-green circular blanket stitches (center)


Added orange blanket stitch triangles on purple square and the lace medallions with lavender circular blanket stitch in the blue green check (center)

Yellow on the purple is a new stitch called Basque stitch

yellow green herringbone on purple plaid plus red french knots  was fun to do (lower left) 


All the crazy quilt blocks spread out on a double bed in Manassas last time I began work  looked pretty close to ready to assemble 

Wide view of the room where I worked on the crazy quilt in 2009-10 


Wednesday, September 21, 2011

an adjustment

Felt hangs on a pole, a new quilting aid. 

Home from two weeks at the Chesapeake Bay as I settled into  our one bedroom apartment I quickly found I needed to get a felt on the wall to work on the quilt blocks. First problem was our vintage plaster and lath walls. I couldn't push a pushpin into them to hold up my big white felt. This great 6 x 6 foot white felt I used at the red bay house so effectively for the first time is now essential for designing the layout and considering the colors and shapes of any quilt. I knew I would have to find a way to get the felt on the wall before I could continue working on the this newest quilt in earnest. I let it sit and day dreamed about possible solutions.
view of the entire pole hanging near the ceiling
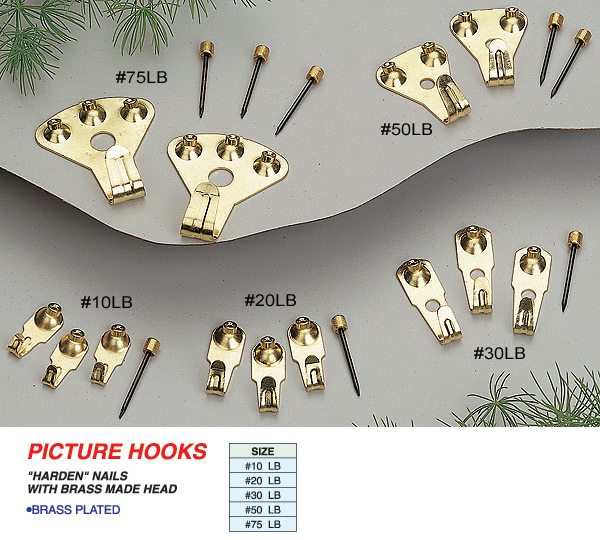
I tried pushpins first and that was impossible. Then I tried some duct tape, and that worked for about ten minutes! Then down came the felt little by little, one corner slipping loose re-stuck then another and it was clear that I found something duct tape can't do! The sticky duct tape pulled loose from the felt but not the wall.  Then I thought again about what could work without putting massive holes or sticky glue on our walls. I have one wall in my bedroom that is free of artworks in frames. I decided I would dedicate this wall with a rod quilt hanging system for my felt or finished quilt work from here on in... I went the next day to the local hardware store and bought an eight foot long wooden closet pole as straight as could be found, in addition to two eye hook screws. I got it home and drilled holes into the ends of the pole.   Then I screwed the eye hooks into the ends and added picture wire loops to hang the pole on picture hooks. I use an European type of picture hook (see a picture of hooks here) which have pin like nails with a brass hook, these are best hangers I ever found for plaster walls. I learned about them from my years as an art installation worker where we had to be very concerned about damaging clients walls. These picture hook nails don't break the plaster like normal nails do because they are very sharp, thin and extra hard steel. They can be reused too and don't leave a big hold in the wall when you pull them out like other hook and nail hangers.

I set up the sewing machine on the porch table. I then got the felt, folded and pinned one side over and sewed a long channel to hang on the pole like a curtain on a rod. Strung it on the pole then climbed up and hung the felt on it's new rod about six inches from the ceiling.
While I was wondering what to do about my felt hanging situation I had  a conversation with a social worker from the Veterans Administration who said that quilters she knows work with a whole room of their house devoted to the purpose of quilting! We sure don't have that kind of space but I am doing the best I can by giving one wall to felt for designing. I still have to iron on top of a carefully padded dresser. And as you can see a lot of other stuff.
ironing board area at foot of the bedroom 
Then I run out to the back porch studio where the light is great and the sewing machine sits on the work table while I am using the space for sewing. It's kind of a long walk from bedroom corner to the ironing station then out back to the sewing machine and back for each new seam I sew but I don't know how else to do it right now. The trouble is the best light my old eyes need for detail work is on the northwest facing all glass porch.

Check out the new block I created after I got the felt hung and began working again. I wanted to show that things were kind of jagged and giggled at the Bay the two weeks we were there. Our first earthquake shook us seriously and made the house feel unsteady under our feet and flying branches broke a window pane during the hurricane. Otherwise the experience was a delight and even those things were adventure full of adrenalin.
first time adding a Y intersection where three seams come together at the base of the V insert. 
 This still needs to be refined and tried a few more times to get the hang of sewing V shaped inserts. I think it is not bad for a first try with no instructions. It is engineering fabrics to do what I want them to do. Suddenly I have a new understanding of what piece work is all about in quilting.


Sunday, August 28, 2011

retreat with a hurricane


Molly's red house is down under the hill in a valley that leads directly to the bay side beach. 
I have had the most wonderful two weeks full of fun creative and colorful experiences. My pal Molly Ruppert and her big family have a few homes out in a community called Fairhaven Cliffs, Maryland very close to Washington DC on the Chesapeake bay. She asked me late last spring if I wanted to come have a few weeks artist retreat in one of the houses that is normally a rental that was vacant this summer. I responded that I would like nothing better! When and what were the conditions. She wrote and said I could have a house with three bedrooms and all we might have to do in return was to mow the grass once and I could bring whom ever I liked to my retreat.We choose the last three weeks of August since Keith was out of town much of July and was very busy in June. August suited me too because this time of year in the city is typically very hot and muggy and mosquitoes are king. The garden is tired and dry grass is brown and dusty but I also have my annual birthday and what better way to celebrate than a retreat to make art at the beautiful bay.
 We packed up two Sundays ago and took food, pillows, sheets, art supplies and all sorts of exciting ideas to the bay house. I even took mom's feather weight Singer sewing machine to see if I might have space to make some fabric art. I also bound a special book for my daily sketches at the bay of large pages from the spare papers I have been saving for years for other projects that have accumulated in the folios in our studio. It was a perfect beginning. We ate a big dinner at Molly's the first night after we got keys and settled into our Red house. The folks in Fairhaven call the houses by their colors not addresses. The Rupperts call them by the family member's name that owns them. 
So we had the red house the place is an old beach house that was just perfect for us to make art and not worry about messing anything up. It is more space than I think I have ever had to work for more than a few hours at a time. I had a whole bunch of rooms to live in and a yard and the bay .... it was ideal. Nature is all around the house the hills behind are covered in a vine called Kudzu which is kind of creepy but also sort of magical in that it makes everything very green like topiary trees of mysterious shapes. 
from the end of the pier looking back at the cliffs and the beach and in the distance the red house.
looking at the house and the yard and bay beyond from the roadside above. 
Kudzu grows right up to the roadside and covers everything including dead tree trunks...
at dawn the sun showed me a kudzu bear and elephant at the edge of our yard!
 first Wed. afternoon a regatta of sailboats appeared on the bay
the first crab skeleton I found on the beach 

Our resident spider named Charlotte, naturally worked on her web daily. 
Keith worked every day on amazing arrangements with materials he collected right there in Fairhaven. Gardener neighbor Juanita Foust was very supportive and offered us anything we wanted from her garden and several other yards of vacant homes up for sale. 
butterflies were abundant and posed for my camera nicely. 

dawn on the bay was spectacular as the half moon hung over head and the sun came up red as fire
Not only did I enjoy making photos and drawing and painting each day but I also undertook a big quilt project inspired by the bay windows and the many colors and patterns of the experience of being in this great place for two weeks. I saw exciting patterns and colors and went right in and added them to make up a bay window inspired work. I worked almost every day a few hours if not longer on the sewing in a room that was intended for guests none of whom ever came. I used the empty single beds as my work tables and sewed on mom's machine until it gave out. Had to drive it to the sewing machine doctor this past Monday and there I found another one older but more valued by collectors. Who collects sewing machines I wonder? Anyway I could not resist using my birthday gift money to buy the sleek 1935 Singer featherweight sewing machine to get right back to the bay and work on the project that I was so deep into by the beginning of the second week. Now I have my own and I can leave mom's at her house for projects out there... it's perfect.
my birthday gift the singer sewing machine in perfect working condition. 
for my birthday I also got these beautiful antique plates like one I had to eat on as a child. The chocolate raspberry butter cream with brown sugar whipped cream was also a real treat but tasted even better on the depression era crackle plates. 
Then Tuesday morning while eating a delicious breakfast one of my teeth broke off! It didn't hurt but I was concerned it would so I called for a dentist appointment and had to drive back to the city very early Wednesday for a walk in visit. Then later Tuesday you all know that we had a 5.8 earthquake that shook up the east coast. It didn't stop us for long but we were really scared when the oil tank alarm went off in our red house. We found it and turned it off and rushed to the land line phone to call Molly but neighbor Juanita saw us and asked us if we were OK before we got the call dialed and explained that the shaking was an earthquake not an oil tank about to explode! What a relief it was to learn that our house and this wonderful vacation was not going to blow up all our fun. I got my tooth fixed and got back to work on my bay windows project soon as I got home and settled but we had to start getting ready for the weeks next disaster headed our way. Irene a hurricane was on the way. We decided to stay as long as we could to see what it was like if the neighbors were safe we figured we could be too. We shopped for supplies, cooked frozen meats and made ice to keep things cool... filled up big bottles of water for when the power went out and we had no well water to flush toilets. It was kind of exciting but not nearly as alarming as watching the news broadcasts full of doom and gloom about the terrors approaching the east coast would be had we been able to see them. We took all needed precautions and worked to use our last hours of power before the storm.
Irene arrived on the Atlantic coast miles from the bay about eight and the winds were strong, the rain fell in sheets all afternoon and into the night. We tried to ignore the sounds but the crash of a branch through a window and the flickering lights were alarming. We fixed the broken window with a little duct tape and a black plastic bag and one of those old fashioned window screen devices that held it in place. The lights went out right after we got the glass swept up from our broken window. The next part was sitting next to the open windows listening to the wind blow the trees soggy leaves and crashing branches falling & splitting. I suggested we read by our hurricane lantern in the bay room and we did for a few hours then about 10:30 we went to bed. It was black outside so we couldn't see anything and it wasn't safe to go out to look to see what those crashing sounds were. As long as they didn't land on us we were good. We woke to lighter rain and softer winds a tree had fallen and a few branches were broken. Fallen leaves were everywhere the car was waiting and the roads were soon open. We took a last walk on the beach then a tour of the little community of houses and checked on our neighbors. Then packed up our studio and the food and headed home. The trouble is there won't be power back for days if not weeks. No water, no power and only charcoal to cook with is too much of a hardship to give us time to be creative. We had a great two weeks with some really high drama moments but many more fun hours of simple walks on the beach or visiting with Rupperts and each other. I spoke to Molly this afternoon when we got home and she says we can come back when the power is restored for the third week she promised us. I said Hooray, that is just what I was hoping we could do because a retreat this much fun is very hard to give up for any reason. So hurricane Irene wasn't so bad to us after all.

the night before the storm arrived a beautiful view of the bay. 

cliffs before the storm at low tide. 


the tree that fell by the red house covered in ivy is barely visible but the root ball shows in the mud at it's base.
Keith standing in front of the fallen tree this morning 
 cliffs at the end of the beach after the storm 
 bay after the storm
at the base of the clay cliffs leaves and balls of various colors of clay rolled in balls upon the sandy shore
across from Molly's house a real broken maple tree 
sail boat that washed up on the big beach across from Molly's house