Showing posts with label Denyse Schmidt. Show all posts

Monday, May 23, 2016

Improvisation on Shoeman's Puzzle Quilt finish

Shoeman's Puzzle improv quilt 88 x 90 inches hand quilted 
June of 2015 DC Modern Quilt Guild hosted Denyse Schmidt for a quilting improvisation workshop in which I was fortunate to enroll and wrote about last year. (follow this link to read that report)  She gave us a traditional pattern lesson then we were instructed in how to play with the shapes and develop the blocks in a free form way. Improvising with the wedges of two tones of the same color to form a playful modern look with an old fashioned repeating block design. I chose two shades of orange for my quilt lesson.
the traditional Shoeman's Puzzle blocks before the improvisation began 

Denyse talking about the designs

layout becomes the next decision, these are in the traditional star or flower layout 

We spent the whole day working and sharing and reviewing our progress as about 20 quilters improvised with their colors. I tried adding a little magenta with pattern and was relieved to get away from the all orange blocks but in the end decided I needed to keep to the orange theme for a finish that was true to the intention I set out with to make a new orange quilt. I completed the quilt with rows of pie shapes going this way and that dark in light and light inside dark alternating in rows. It took a long time to get it laid up and then figure out how to sew them together without messing up the order I had chosen. Thanks to some ones' picture online I discovered marking with numbered pieces of masking tape would help me organize the trip from design wall in my bedroom to the sewing machine in the living room and back to the wall. In the end I messed it up but decided I liked how a couple of my rows got flipped over and went butterfly like, instead of march stepped in the same direction. 

Then the finish got a couple of sashes worked into the rows and ripped out later because it again seemed to my eye to distract from the repeating design feature and the way the areas come together. See the image below for the strips running through about one third and two thirds of the way across from side to side.  
As it was laying on the bed I figured it was the wrong design to have the rows interrupted by these long narrow strips. It took a while to sink in but eventually I knew I had to rip them out.    


all sewn together on my 221 Singer Featherweight
It's not a lot of fun to rip such long seams out but it is more fun that leaving a design you don't like with months of hand quilting ahead. It just made sense to me to rearrange these rows without the separations. Once the top was completed I added long slanting strips about 6 inches wide to the edge to make the quilt top a little larger to fit the bed. 

Next I launched into the back design. I chose a reflection of the top's design by making a giant block of the traditional Shoeman's puzzle to cover the back using light shades of white. I chose two white prints on off white fabrics to give a to rest from the orange when all that orange is just too much. This means the quilt can be flipped over and all you see is one an orange binding on a simple white on white design with big stitch quilting. Making the back so large required clearing the living room floor to cut and assemble these huge puzzle pieces into a quilt sized block and then I had to add a 5 inch border all around to make it big enough to cover the quilt top. Again I cut the shapes for this bed sized block free hand on the floor from yardage. That was a real challenge but it went off smoothly once I made up my mind to work it out. 

Here is the top with the batting and the backing spray basted in place ready to begin hand quilting. 
On the floor I marked my quilting guide lines by using the Hera marker and following the edges of each of the lighter orange shapes about a quarter inch inside the seams. Quilting began with size #8 ecru pearl cotton thread and my big # 6 crewel embroidery needle and my favorite thick goat skin thimbles. 

 crease marks the Hera marker leaves on fabric as my guide to quilt.
Beginning in the center I use a standing hoop simply to keep the quilt elevated so I can put one hand under the quilt and the other on top to do the quilting. It took a long time to finish quilting this big quilt and once I was done I realized that this white line pattern wasn't enough quilting. Eventually I decided to add some orange pearl cotton #8 to the darker orange parts and chose to contrast the sharply angled lines with circles of various sizes all over the quilt. Phase two of the quilting moved along slowly but the end was in sight, making it seem a little faster. 


The back of the quilt looks like these detail shots above with just some big stitch quilted white lines and some orange circles... the label is a tribute to Denyse Schmidt for the class and all the inspiration I have collected from her workshop and her book. It's been a slow process to complete this quilt, mostly because I hand quilt but every stitch was a delight even the ones I had to pull out. Now I have it washed up and dried in the dryer for that nice crinkled soft touch of a new quilt on our bed today in the cold damp it's a very rewarding creation. 
detail of the turned back edge with lots of crinkle. 

finished on the bed ready to use


Friday, January 29, 2016

Orange Raspberry Quilt finish

Orange Raspberry quilt finish 29' x 57' 
This was a small quilt project I made as a gift. It's for a friend from my college Printmaking classes at Pratt Institute who has a new home of her own she acquired last summer. It is her first home which Keith and I went to visit during our big road trip last August. She has a big collection of artworks and had reserved a special place for one of my quilts. While we were there we measured the spot she reserved, intending for me to match up the space to fit the finished quilts I have at home. It is a place of pride by the wood stove in an alcove right in the center of the living room. I suspected right away that my finished quilts are a little bigger than what would fit in this space but I kept quiet because the idea to create a custom quilt suddenly leapt into my head.
left or right of the wood stove spaces reserved for a quilt

The 1930s bungalow front porch
I began this quilt with orange fabric because of the reactions to my finished quilts she had given while visiting Washington, DC and I know she likes orange.  I wanted to experiment with several new techniques. The fabric colors I limited to orange, orange-red solids and a raspberry stain magenta print. I began with several blocks from the improv workshop with Denyse Schmidt last summer that I decided not to put in my bigger all orange quilt. It took off from there making new blocks by whacking those improv blocks up to making new ones.  Then I began using a new technique of the eighth inch strip stripe inserted in a block which I discovered on Instagram. This is an example below. 
these colors are closest to the real quilt colors. 

While working I was thinking about handsome mid century chair's upholstery color and dots and the lines in the architect's modern garden features as references to fit this angled improvisational quilt design with round dots and triangles of hand quilting on the finish. 
orange dots on pink mid century chair

garden view 
It fell together quite fast since it is small and I had a lot of fun playing with the colors and pieces to create the top. Once the top was assembled I used an art quilt technique to put the three layers together. Instead of a binding tape around the raw edges, I used an envelope or pillowcase technique for the first time. It worked quite well and gave a nice finish without a tape frame. 
The quilting was fun. I used a contrasting pearl cotton size number eight with big stitch to show the piecing off and followed the angles then added circles to reflect the chair's dots. As you may notice the quilt colors are different in each slide. While photographing these close value oranges and high contrasting magenta I learned it confuses the camera. In some lights it looks like yellow and purple but that is not the way it looks in person. I marked the slide that comes closest to the real colors.
I gifted the finish to my friend just after Christmas when she came to visit and it was such a surprise and I gather she is very happy. She went right home and hung it in the space she showed me she wanted to display an original quilt last summer on our visit. Bonus shot includes one very interesting cat named honeybee passing by the new art work and she is the reason this collector doesn't think she can take home a quilt to use on  her beds since miss Honeybee sleeps on them. I liked the cat and wonder if there is a color quilt I could make that wouldn't show her fur? 

Finished Orange Raspberry Quilt 12-21-2015 
size 29" x 57" all cotton 
hand quilted with pearl cotton #8


label on the back 

Wednesday, January 2, 2013

shoofly a new year's project

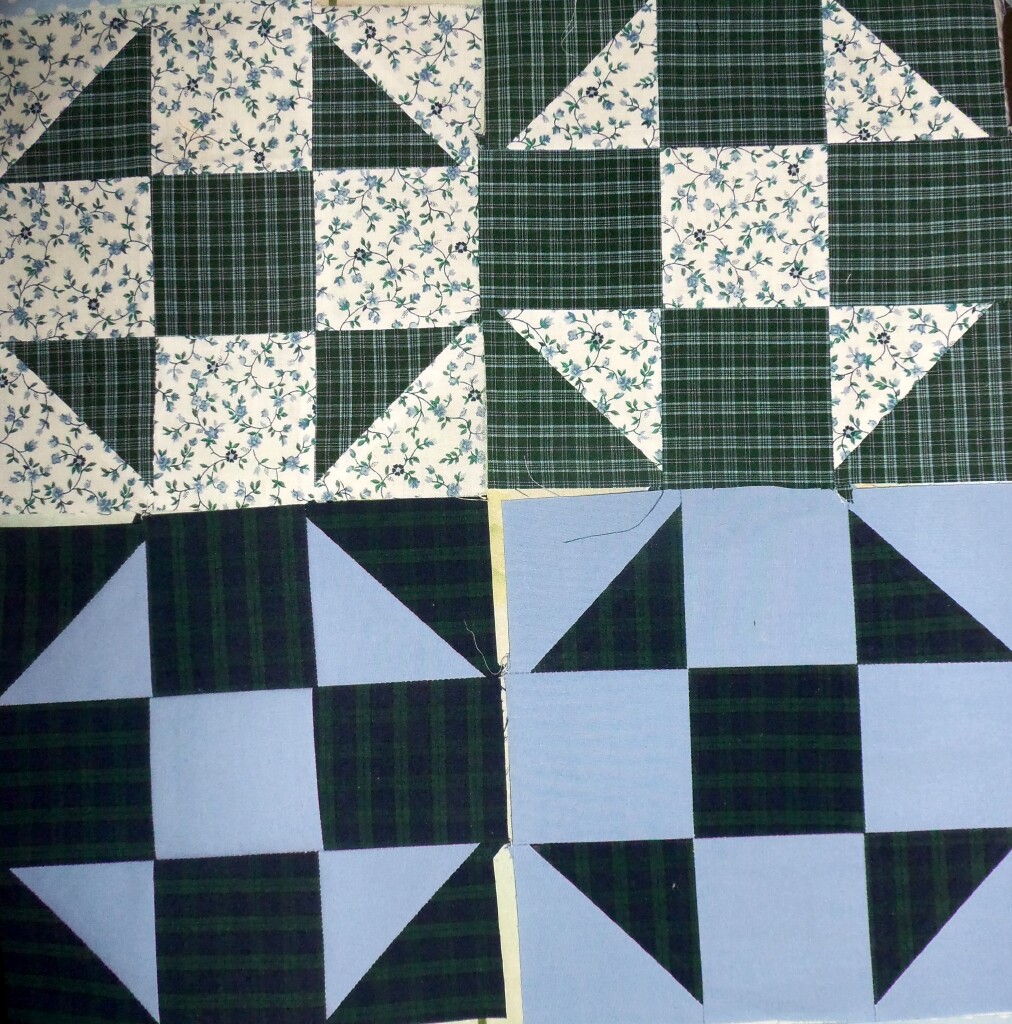
first blocks using two plaid fabrics gifted by Jason Alexander
Last week when I was thinking about how to use some fabric that I have for a DCMQG challenge. These fabrics are a collection of Madrone Road prints. Five little one eight yard squares are to be turned into something quilted by end of this month. Since I only have those fabrics in small supply I started looking around for a new block design I liked and wanted to try. Studying a book on the basics of block designs as they are seen by the folding of paper "origami"  helped. Kei Kobayashi's 520 Quick and Easy Patchwork Designs published in 1993 gives me all the basic designs broken down into groups of numbers of squares that make up a square block in a zillion different ways. It's mind blowing to see them all drawn out in simple black white and gray formatting. Luckily that book also has a few full color heirloom quilt examples to help the quilter visualize possible uses of these simple graphics. The black and white designs become a skeleton to build your block designs in your choice of colors. I was thinking about how to divide the Madrone Road fabrics up into light, dark and medium values when I came upon the idea of making a test block using some other fabric.
laying out pieces to build each set of blocks on the  ironing board 
 During my Christmas visit to Manassas, I was given some old clothes by a friend as  I was showing him some of my quilting projects. Jason Alexander and his wife Maria are fun people and live the good life following their dreams. He makes pottery and teaches and they are in the process of building a home and studio in the woods... I began making a Shoofly block the day after Christmas and New years day I finished the 28th block using two woven plaid fabrics from Jason and a number of my blue and white fabrics from my recent projects. It's always exciting to be in the process and usually snow balls once I get a pattern going. This was meant to be a test block project for the Madrone Road fabric challenge and seems to have expanded into something much bigger. Who would have thought that such a small bit of fabric could inspire so many blocks.

Also inspiring me was another gift, the beautiful new book by Denyse Schmidt Modern Quilts Traditional Inspiration. I got permission from this book to substitute a few like fabrics that were not from the same sources, they look alike enough to pass and add some sparkle to the finish collection of blocks. Doing this reminded me what my color teacher, Mary Buckley, always told us to do when working with color "add sparkles, glitter" or some feeling of a brightness to make the work live! Leaving off some of the perfectly matched fabrics and adding the almost matched is a real relief to the eye but I know it is unseen at first glance.

Here are the images of the blocks, now I am trying to sort out what the blank spaces will be filled with to finish to top. Will I use white like the felt wall, pebble gray print- a neutral with texture, darker blue or perhaps a light lavender, then there is a surprise orange? Those are a few choices I have to make before I take the next step to complete this top and any suggestions from you readers are always welcome.


some of the mixed up shoofly blocks on the white felt wall

shoofly blocks on pebble gray

shoofly blocks on warm blue
the orange option 

yellow on hand recommended by Elle